Bootloaders and ARM Cortex-M microcontrollers (STM32F7): Introduction
Contents
We are introducing a new series to the blog, containing all about bootloaders for small ARM Cortex-M microcontrollers. I hope you like it.
What is a bootloader?
A bootloader is a piece of firmware that takes care of booting the target application, as well as providing a mechanism to update the firmware on the field, where you don’t have the means to flash the device using more advanced hardware interfaces such as JTAG, SWD or ICSP.
Ok, that makes sense, there must be generic bootloaders that I can use for my application right out of the box, right?
While there are many open source implementations of bootloaders for many microcontroller families, it might make sense to roll out your own bootloader. Think about the following reasons:
- Your system may require the update of multiple flash memories (some of which may belong to a particular processor) on the field. After all, we are talking about updating your device, not simply a microcontroller.
- You may want to use a custom communication interface that available bootloaders don’t support. Many, for example, don’t support updating through an Ethernet network or BLE (these are also called Over-The-Air bootloaders).
- You may want to use a custom memory layout where the bootloader will be located and protect it from being overwritten by the application code.
- It might be desirable to protect your firmware object code from being intercepted during the upload process. Depending on your security threat model you may want to encrypt your firmware before it travels through an unprotected channel.
- On this subject, it is also interesting to sign the binary firmware image to protect from malicious firmware being loaded onto de device.
- If we start using complex communication interfaces and security measures such as the ones described above we will end up with a large bootloader. This means that the flash space partitioning between application and bootloader must be properly delimited according to the block size of your non-volatile memory.
- Bootloaders can also check firmware image corruption and stop the boot process if the calculated hash is no expected for the loaded firmware version.
- Verifying the signature during boot time is also interesting and constitutes the basics of Secure Boot, where we establish a root of trust in the system (this may come in the form of a ROM memory with the first stage bootloader) which verifies the integrity of all other components being loaded on the processor.
- Loading an application in SRAM without replacing the existing applications on the Flash. This might be useful if we want to run maintenance software on the device, but we don’t have space to store it on non-volatile memory or simply we don’t want to for some other reason (security or convenience).
As you can see, a custom-tailored bootloader is very common for small microcontrollers where Flash space is limited and switching from one microcontroller to another raises different concerns in terms of security, booting process and firmware integrity.
Requirements for our bootloader
This post will deal with the basics of building a custom bootloader for an STM32F7 microcontroller. These are the specs for the bootloader:
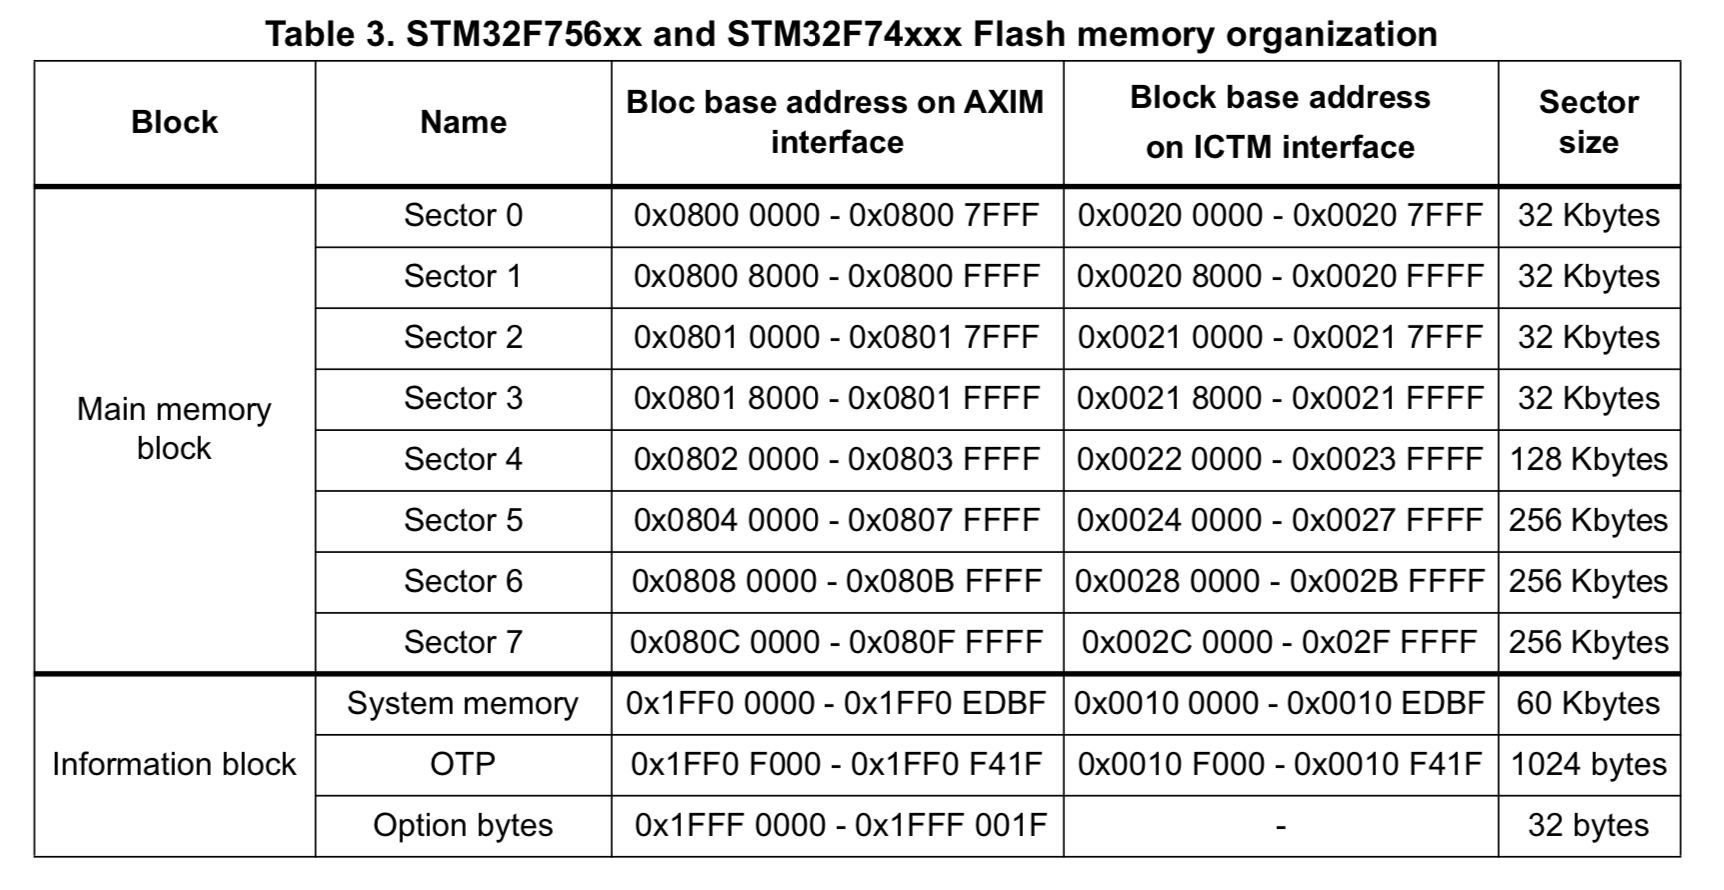
- It must fit in the smallest sector of the built-in Flash for the STM32F746 microcontroller. In this case, the smallest sector is the first, with 32 kB of memory available as you can see in Figure 1.
- It must be able to load code into the Flash memory without corrupting the bootloader even if requested from the user.
- It must be able to load code into the SRAM memory.
- It must be able to run code from both of these targets when instructed to do so.
- It will provide a communication interface using a UART.
- It must not use any libraries other than the standard C++ library (libstdc++). This will limit code bloat and reduce the size of the binary.
With 32 kB of code available to the bootloader, we should have a good base for extending the bootloader with more impressive features in the future.
Regarding the first requirement, we can’t use less than 32 kB, since to program a sector it must be first erased as a whole. Loading an application into the sector shared with the bootloader will erase the bootloader. We might get around this by copying the bootloader to SRAM on boot, but then we are limiting the available memory for SRAM Applications and potentially risking bricking the board if the power is cut during the update of the bootloader sector. Since we don’t want to run the risk of bricking the microcontroller, we can just protect sector 0.
Roadmap
I have distributed the bootloader series in a few posts that will cover the complete process of developing a bootloader and the requirements of applications that can be loaded using the bootloader. This is what you can expect to see on the next posts:
- Designing the bootloader.
- Starting a target application from the bootloader.
- Interfacing with the host. Designing the bootloader protocol.
- Writing to the flash memory.
- Developing a host application for the bootloader.
This is all for now. If you think you might learn something new from this project, stay tuned for the next installment of the bootloader series.
Footnote: You can check the complete bootloader here, but I think you will find more enticing getting a complete description of the design and the development of the bootloader.
Author Javier Alvarez
LastMod 2019-05-19